
Here’s my latest side hustle experiment:
3D modeling jewelry in Blender, test-print it on my 3D printer, and then send it to a metal casting service provider to convert my creation into a piece of precious metal jewelry.
When the jewelry looks good, I’m going to make it available in an online shop for everyone interested to buy it.
When somebody orders a design, my on-demand service provider will create the jewelry piece and send it to the customer. I just lean back and wait for the money to come in. It’s like print-on-demand t-shirts, but with jewelry I designed from scratch.
You can read more about why I want to try 3D print on demand in this article.
So far the theory.
Let’s see how that’s going.
Step 1: Come Up with Some Jewelry Design Ideas
First, I had to come up with some ideas for a jewelry design. I didn’t get too much into research here; to learn the ropes I want to focus on creating jewelry I like, so there’s no real research behind the designed pieces.
I have at least a dozen pages of jewelry design sketches now, but these two are the jewelry design sketches of the pieces I decided I want to make:

So far so good, on to the next step!
Step 2: 3D Modeling Jewelry in Blender
There is probably 3D modeling software out there that is better suited for jewelry design than Blender. But I know Blender, it’s free, and I’ve seen people on Youtube create jewelry with it, so I went with what I already know.
I have some experience in low poly 3D modeling, but I quickly noticed that creating detailed, printable 3D models is a whole different story. Of course, any 3D modeling experience comes in handy anyway – my Blender experience was definitely useful.
However, working with highly detailed models requires some more computer power and a lot more use of Blender modifiers than low poly modeling. In summary, I had to learn a thing or two.
File size actually matters
I wanted to be extra sure to have a flawlessly smooth piece of jewelry in the end, so I was careless with adding more resolution to the 3D model.
Until I tried uploading my file to Shapeways.
Shapeways, and all other 3D printing service providers for that matter, restrict uploads to a maximum file size. In the case of Shapeways, they don’t allow files bigger than 64MB.
So I had to go back into Blender and tweak my jewelry piece, keeping the balance between having a smooth, detailed model and keeping the file size in the range of the 3d printing service providers’ requirements.
Here’s a comparison between the first version (file size 258 MB) and the final file size ( 40 MB). You can see some “pixelated” areas on the 3D model on the right, but it prints perfectly smooth with my 3D resin printer.

3D models need to be “watertight” for printing
I wanted to compare prices, so besides Shapeways, I also uploaded my models on 3dshop.io to get a quote. Their automatic check immediately reported holes in my model and asked me to fix that. Yes, 3D printing requires the 3D model to be solid without any holes.

My jewelry pieces consist of multiple small detailed parts that would have been very tiresome to model into one piece, so I tried merging them in Blender with some built-in tools.

I quickly learned that Blender doesn’t do merging that well, not even with additional plugins. Apart from it taking forever (i.e. 10 minutes) to merge only two parts together, it did not create a solid, watertight model in the end.
Meshmixer to the rescue
Some googling presented me with the solution to the problem of the holes: Meshmixer, a free software by Autodesk.
Meshmixer is usually able to create a solid 3D model out of anything you import. So I exported my jewelry model parts as a single *.stl file from Blender, imported it into Meshmixer and created a solid 3D model with it. There was some parameter tweaking needed, but overall the process is quite straightforward.

Requirements for 3D Modeling Jewelry with the Goal of Metal Casting
With 3D printing come some limitations, for example the level of detail your printer can print. Resin printers are able to print the tiniest details. My 3D resin printer can print with a layer height of an astonishing 0.01 mm.
If you want to cast your printed model in metal, then you will lose some details, and if you choose some post-processing like polishing, you’ll lose even more.
While my first model is pretty simple and has few details, the second one is as detailed as I think I could get away with. Shapeways lists all the requirements for metal casting, but I found it hard to judge whether my model complied with them or not. I figured if I could print it on my resin 3D printer with a layer height setting of 0.035mm, Shapeways could do so as well.
Here are the test prints from my 3D resin printer:

After I had solid, watertight 3D model *.stl files in the required file size, and had test printed them on my printer, I thought I could go ahead and order.
But wait, there’s more.
Step 3: Ordering the metal cast pieces from Shapeways
At this point, I had prepared two 3D models to test some concepts, mostly for technical feasibility. I planned to “print” one in brass, which is the cheapest metal available, so that’s great prototyping material.
The other jewelry piece I wanted to order in antique silver to test a specific concept that requires oxidized silver (available at Shapeways as “antique” finish).
I uploaded both jewelry pieces to Shapeways, selected the materials, and put them in my cart. Then I went to check out after having a small heart attack when seeing the shipping price of $35.
The 5 weeks production time was the next shock, but unfortunately not the last. On the last page of checkout, Shapeways informed me that they wouldn’t send me the silver pendant because I live in Switzerland.

The issue seems to be that most countries in Europe require hallmarking of precious metals like gold and silver. You know, that almost invisible stamp on your 925 silver jewelry? Yes, Shapeways doesn’t want to do that, for reasons not disclosed.
After some steaming, I decided to order the second jewelry piece in brass as well. As a finish, I ordered both pieces to be polished, because most people prefer their jewelry to be shiny, so it’s likely that I would be selling polished jewelry.
What having metal cast two pieces of jewelry cost me
Even though I ordered both pieces in brass, the polishing postprocessing makes the pieces more expensive than I would have thought. I understand that most of the costs for the smaller piece comes from the work needed to create it: printing, casting, polishing. However, I expected material cost for the bigger piece to be cheaper.

In any case, I’d be totally fine with the price if it wasn’t for the overly expensive shipping, but that’s probably just Switzerland.
Step 4: Wait for your order to arrive
Once I had placed my order, my models went into a human checking process to see if they were printable. While the simpler one was approved the next day, the detailed castle one was rejected after a few days for the reason that the details might not be visible in the final jewelry piece.
I contemplated changing the 3D model, but at that point, I was out of patience and just wanted to see my metal-cast jewelry, perfect or not. Luckily for me, Shapeways offers what they call “print it anyway” for prototyping purposes. Print it anyway means that Shapeways will print my model but rejects responsibility if it breaks or doesn’t turn out well in any other way.
I approved “print it anyway”, and then I waited.
And waited.
And waited.
You know how everything is going so fast when you’re an adult, but an order that doesn’t arrive in a week seems to take FOREVER?
There’s the possibility for priority manufacturing, but of course, you pay extra for that.
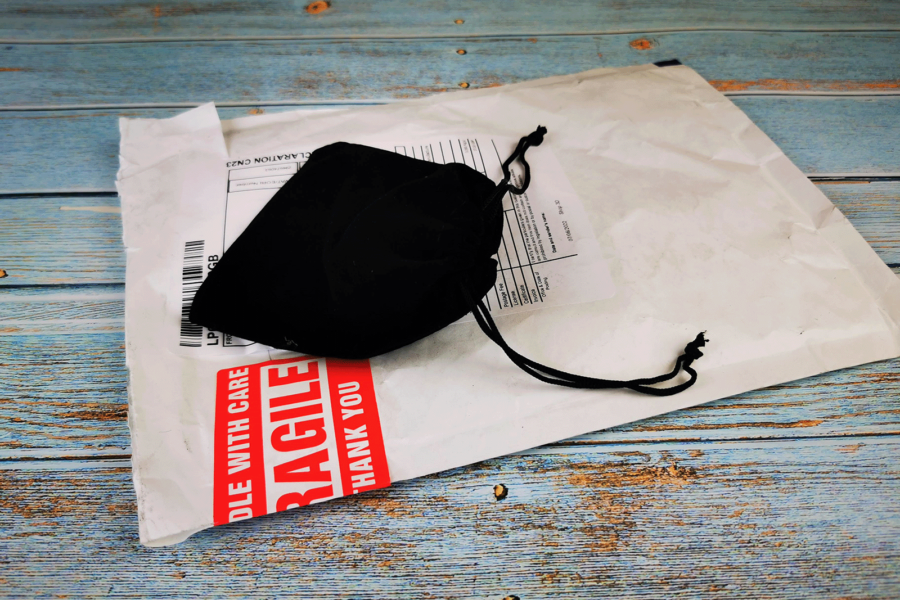
And then my samples finally got shipped, after a bit less than 3 weeks, earlier than the 4 weeks promised when ordering:


Shipping at least was quick, which I had been hoping could be expected for $35. On the downside, I paid another $30 import taxes. Together with shipping, I had now paid more for shipping and taxes than for the actual jewelry. Welcome to Switzerland, the land of it-sucks-to-order-from-abroad.
Results of My First 3D Modeling Jewelry Experiment
But anyway, here are the results, compared to my resin test print. The pendant is 22mm x 11mm (0.45in x 0.87in), so it’s pretty small.

Here are two more close-ups (boy taking pictures of jewelry is hard):


I’m a bit disappointed by the polishing job. But with me knowing nothing about metalsmithing, it might not be possible to polish it better in the harder-to-reach areas. The less accessible areas also have some spotty discoloring.
Those flaws make my idea for this pendant invalid – I thought I could offer a shiny, perfectly polished, dainty pendant. So in case you want to sell something nicely polished, make sure all areas are easily accessible for polishing.
Let’s have a look at the other piece I ordered, my highly detailed castle pendant:


This was the “print it anyway” piece. It took me quite some time to notice that indeed some details were lost, but it doesn’t bother me. Overall, the detail accuracy is stunning (keep in mind, this is 17mm x 49mm / 0.6in x 1.8in). Also on this piece, the polishing is quite scratchy in the less accessible areas, but my jewelry design would see those darkened anyway.
Conclusion
It was probably a bit naive to think that I would get almost perfect results with my first try at 3D modeling jewelry. But I’m quite happy that both of my jewelry pieces were printable, castable, and overall turned out quite ok. I can definitely work with that.
I will continue to model more jewelry and order samples. Actually, meanwhile, I have already ordered one of the models from shop3d.io to be cast in silver with antique finish. Shop3D seems to be fine with sending silver pieces to Switzerland. They also offer more shop functionalities than Shapeways, like combining jewelry, adding jewelry parts, or sending jewelry to your customers in branded packaging.
There’s definitely more work to be done until I can sell print-on-demand jewelry, but I’ll get there.
What do you think of the results? Let us know in the comments!


Leave a Comment